Monday, December 21, 2009

Raspberry Almond Thumb-prints


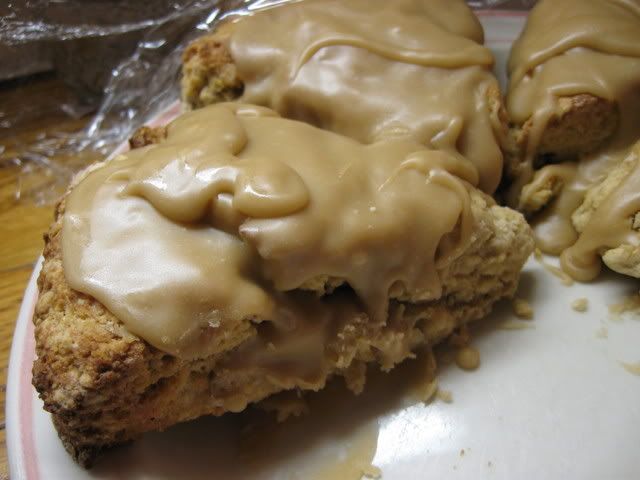
These... are just awesome. I made them for our church Christmas party, and a bunch came back home with me after. This is not a good thing. I had a resolution to maintain my weight throughout the holidays. I'm worried now. These things are addicting. Try this recipe at your own risk.

Raspberry Almond Thumb Prints

1/2 C butter, softened
1/2 C sugar
1 large egg, separated
1 tsp vanilla
1 1/4 C flour
2/3 C sliced blanched almonds, coarsely chopped
Raspberry jam

Beat butter with an electric mixer until creamy; gradually add sugar. Add egg yolk and vanilla, beating until blended. Stir in flour. Dough will be crumbly, but easily pressed together. Form into a ball, wrap in plastic-wrap and refrigerate 3 hours.

Let dough stand for a few minutes at room temperature. Shape into 24 balls (3/4" or so. I used the small Pampered Chef scoop.. yes, I admit, I love those things, nearly to obsession.) Lightly beat egg whites. Dip each ball into egg white then roll in almonds, pressing firmly. Place on lightly greased pans, 1" apart. Press an indentation in the center of each with your thumb, and fill with 1/4 tsp raspberry jam.

Bake at 350 for 15 minutes or until lightly browned. Cool on wire racks. Try not to eat more than a dozen in one sitting.


New meaning for "Pizza Pie".

I've been making a lot of pies lately, so when mom asked me to make pizza one night, my hands automatically wanted to crimp the crust. I laughed to mom about it... and then I decided to go ahead and do it, to see what would happen. I wasn't sure the crust would hold the shape, but it did!


Chocolate Raspberry Scones


I'm not a huge fan of raspberry flavored chocolate, but raspberries and chocolate are a totally different story. We have a bumper crop of our own raspberries stored in our freezers, and I'm forever trying to think of something different to do with them. When a sweet ingredient needs to be used up, I generally look to scones for the answer. The results this time are amazingly delicious.


Chocolate Raspberry Scones

2 C all purpose flour

1/3 C sugar

1 tsp baking powder

1/2 tsp baking soda

1/4 tsp salt

6 tbsp butter, cold and cut into pieces

2 ounces dark chocolate chunks* or chips (about 1/2 cup)

3/4 C fresh or frozen raspberries**

1/2 C plain yogurt

1 1/2 tsp pure vanilla extract

1 large egg, lightly beaten


Christmas Monster Cookies!


Monster cookies are some of my favorite cookies ever. Huge, chewy and moist, peanut-buttery and full of chocolate, what's not to like? I got this recipe from a friend who runs a diner - never fear, she does not own the recipe, so I'm not betraying her secret recipe. These were very popular at her diner when I was last there; I remember a young boy coming in just as I pulled them out of the oven. He bought a baggy of them, and in five minutes he was back for more. :)

Since these contain M&Ms, they are easily made into Christmas cookies by using red and green M&Ms. I made several dozen for a party last week and very few came home!


Monster Cookies

1/2 C soft butter
1 C sugar
1 C brown sugar
3 eggs
1 tsp vanilla
1 1/2 C peanut butter
1 C flour
2 tsp baking soda
3 1/2 C old-fashioned oats
1 C chocolate chips
1 C M&Ms

Cream butter and sugars together until smooth. Beat in eggs and vanilla, then peanut butter. Mix in flour and soda thoroughly before adding oatmeal. And last, mix in chocolates. I use the large Pampered Chef scoop to drop the cookies onto cookie sheets, but optionally you could use a 1/4 C measuring cup. You'll probably only get about 8 to a pan.


Bake at 350 for 10-12 minutes, until the bottom edges begin to turn brown. They should be still gooey in the centers, this is crucial. Allow the cookies to sit on the pans a few minutes before transferring to cooling racks. The centers will be cooked but still moist, and will remain so for several days.

Enjoy with a cup of cocoa!

Sunday, November 29, 2009

Kitchen Gadgets #1

Introducing - Pampered Chef's medium scoop! Basically a stainless steel mini ice-cream scoop.


Pampered Chef actually carried three scoop sizes, but the medium one is destined to be my favorite. The reason? It's the exact size you need for drop cookies. And they don't make ordinary drop cookies; they make PERFECT drop cookies. Each the same size, each beautifully rounded. The peanut butter cookies I made today satisfy my baker's soul entirely.


I got the three piece set for my birthday ( may I take a moment to say I have awesome friends? I have awesome friends!!!) and they are quickly making their way up on my list of favorite gadgets, right next to the pastry blender.

Another perk to this marvelous invention is that drop-cookies are now a one handed task! I was able to talk to a dear friend on the phone with one hand and drop domes of dough with the other.

Okay, so this one is my favorite, but what of the other two? Well, the large scoop is perfect for muffins, making filling tins very quick with minimum mess. And the small... I haven't used it yet, but I understand that you can make melon balls and fill mini muffin tins with it. There are probably many more uses for these, I just haven't discovered them all yet.

Cranberry-Orange Nut Bread


I love cooking with fresh cranberries, and last week I had a slice of cranberry nut bread at a social gathering. I hadn't had it in a couple of years probably, and I'd forgotten just how good this stuff is! It took me some doing to dig up a recipe that was what I wanted, and in the end it was a locally produced book that I found it in. I whipped up a batch and baked it in mini-loaf pans for our Thanksgiving meal. I hope you enjoy it, it's one of my favorite batter breads.


Fresh Cranberry Nut Bread
In Memory of Ethel Barnett

2C flour
1C sugar
1 1/2 tsp baking powder
1/2 tsp baking soda
1 tsp salt
1/4C shortening
3/4C orange juice
1 egg beaten
1 tsp grated orange rind (finer than regular zest)
1 C chopped fresh cranberries
1/2C chopped walnuts

Preheat oven to 350.
Sift dry ingredients into a large bowl and cut in shortening until mixture resembles coarse cornmeal. In a separate bowl, combine orange juice, zest and beaten egg. Make a well in dry ingredients and pour in orange mixture. Mix just enough to dampen dry ingredients. Carefully fold in cranberries and nuts; do not over-mix. Pour into greased loaf pan and bake for about an hour, until a knife comes out clean.

I baked this recipe in four mini pans for 40 minutes.

Try making this bread a day ahead, and wrap the loaves in plastic wrap overnight. The moisture on the cranberries will disburse throughout the bread, making it easier to slice without crumbling.

Thursday, October 22, 2009

The color of cheese


I'd never given a moment's thought to the color of my cheddar before this summer. I just knew that cheddar is white... and once in a while some off-the-wall store has the orange stuff, which honestly didn't taste as good to me. (Some say there is no difference in flavor, but I strongly disagree!)

Then a friend, visiting from the mid-western part of the country, went grocery shopping with me and had a mini-breakdown. In selecting our cheese, she could find no orange cheddar.

"What is it with New York?" she asked. "All you have is white cheddar! I want my orange cheddar!"

I was taken aback! Now, I love cheese. At one point in life I would have said "If you are what you eat, I'm a block of cheese." But honestly...so what if there was no orange cheddar? The white is better anyway! Most of our cheddar comes from Cabot Vermont, and I like to buy food made in our area, so it didn't matter a bit to me if the mid-western states sell almost exclusively orange.

Then, a few weeks later I ended up taking a tour of Cabot Creamery (a little bit of heaven on earth), and someone asked about the color of cheese.

Here are the, um, facts?

According to the tour guide, back during the War for American Independence or thereabouts, the British were changing tax on all imported cheese, so the Americans started adding a bit of carrot juice to color their cheeses, thereby identifying them as their own and not paying taxes on them. The custom lingered, and orange cheese became the norm around the country, until cheese makers in Vermont and other North East locations decided not to bother any more, to just let cheese be cheese. So, white cheddar is now the norm in New England, New York, Pennsylvania, maybe Virginia. Southern and Western states, however, thought something was wrong with white cheese, so to appease them, Cabot makes an orange cheddar using coloring from Annato seed.

Now, I like the sounds of this tale, but on doing further research I never found this same idea from anyone else. There are various theories about why people use the unneeded coloring.

The point of them all is this:

CHEESE IS NOT ORANGE.

Dye is.

You may be wondering - WHO CARES?

Well, I do. And my friend who brought up the topic does, in a twisted way. I'm sure it matters to other people too, but they are to proud to admit it.

I still feel sorry for those people from the rest of the country who just can't handle the fact that cheese is white, they are the ones who are living with an illusion. Yummy, tasty, white cheddar. I have a block of Wicked Sharp cheddar straight from the creamery in the fridge... I think I'll go have a slice.


The Real Deal

NOTE: I do not mean to attack anyone who lives with and prefers orange cheese. This article and my point of view are meant in fun.

Perogies


Apparently, the world has yet to determine perogies' exact global origin. If you google them, you'll find them described as Polish or Ukrainian food, but also served in Russia and Hungary... all over that area off the world. The recipe I originally started with is Ukrainian. They can be filled with just about anything from savory to spicy to sweet. I've never had any but the (americanized, I'm sure) potato-filled perogie, and they are comfort food! Not something terribly quick to whip up for lunch, but if you have an extra pair of hands in the house to help you assemble them before boiling, the process isn't that bad. A good idea would be to make a huge batch at a time and trow the extra in the freezer for next time.

At some point I want to try other varieties, especially some fruit filled, sprinkled with sugar and served with apple sauce for dipping. I'm sure you'll hear about it when I do.


Ukrainian Perogies


Dough

2 C flour
1/2 C warm milk
1/2 C mashed potato
1 tsp salt
1 Tbs oil

Filling

1/2 C finely chopped onion
1/4 C butter
2 C mashed potato
1 C grated white* cheddar

Mix all dough ingredients, adding a little more milk if it's too dry. Knead on a lightly floured surface until it forms a ball. You want it to be just slightly sticky. Place in an oiled bowl and cover with a towel to rest 30 minutes.

Sautee the onion in butter until well cooked and starting to brown. Mix with potato and cheese. If you use hot mashed potato, allow to cool before filling perogies.

Set a pot of water to boil (the wider it is the more you can cook at once).

Roll out dough very thin on lightly floured surface (0.125" to be precise! Yeah... measure that!) adding as little four as possible to keep it from sticking. Cut 3" circles with a wide glass/biscuit cutter.

Press scraps into a ball, and allow to rest again so they can be re-used. The dough relaxes significantly after 15 minutes or more.

Scoop 1 1/2- 2 tsp filling into each circle (you'll figure out how much is too much pretty quick, it'll gush out the corner!), fold and press closed. The dough sticks together very well compared to some other pastries. The first time I made these I thought they'd pop open, but they don't.


Place in boiling water to cook. Stir once to keep them from sticking to the bottom. They will float after about 2 minutes. Cook about a minute longer, then remove with a slotted spoon. Sprinkle cooked perogies with melted butter and toss. You can either eat them now as a ravioli-like dumpling, or....


.... fry them until golden, as we do. I actually like them either way, but most of my family only likes them fried.
I like to serve them as a main dish with veggies, for a hearty meatless meal.


* See my upcoming post on the thrilling topic of CHEESE coloring.

Sunday, October 18, 2009

Flavors of the Season: Caramel Apple Cider


Now that you all know how to make good raw cider, here's something you can do with the pasteurized stuff (those of you who don't have a juicer) to make it taste better. I admit I used our home-made cider because, well, that's what we have.
Caramel Apple Cider

1/4 C heavy cream
1/4 C brown sugar
3 C cider
1/2 C water

Whip together till stiff: 1/2 C heavy cream
1 Tbs brown sugar


Bring the cream and brown sugar to a boil and add water and cider. Heat until steaming. Serve in mugs, topped with caramel whipped cream.

Introducing: The Juicer!

I am slowly growing to love Fall. Growing up, summer was such a whirl of hard labor and working at the family produce stand that we felt as though we didn't get a 'real' summer. And all fall meant was that winter is about to get here. Boo, hiss. Now though, I've been able to experience summer for all its worth, and by the time fall gets here, I'm ready for it. I have the time to really take in and savor some of the things fall brings. Like apples.


Here in upstate NY, apple orchards abound. In my family, buying apples means buying directly from the growers, which I love. I recently acquired a juicer from a friend (on loan) and when I discovered home made cider I was thrilled! Selling unpasteurized cider is no longer legal, (which annoys me NO end. Pasteurized can not even be COMPARED with the real thing.) so making our own seems like a good option! A bushel box like the one above costs $6, making it very affordable.


In case you every wondered what to do with all the giant pockets on the front of your apron, this picture illustrates their versatility! I fill my pockets with the apples we store in the unheated utility room, and carry them to the kitchen, bulging and laughing at myself.

And now, HERE it is! My (borrowed) industrial Champion juicer!


Oh, and that pitcher of heavenly foamy stuff is fresh cider; sweet, tangy, full of goodness and NOT pasteurized. It doesn't last long around here.

Friday, October 16, 2009

Teisen Cymraeg


AKA Welsh Tea Cakes. I've made them twice now, and they are very nice. They aren't the gorgeous dainty little desserts you'd find in a magazine, they are more like comfort-food. And so I shall share the recipe. It should be noted that this picture is NOT mine, but the cakes look exactly like what this recipe makes.

3 C flour
1 Tbs baking powder
1/2 tsp salt
3/4 C butter
1 C dried currants
1/2 C sugar
1 egg
3-4 Tbs milk
extra sugar
Butter, honey or marmalade for topping.

Cut butter into dry ingredients. In a small bowl, mix together currants, sugar and egg. Add to dry ingredients. Sprinkle in milk 1 Tbs at a time, mix until all ingredients are moist and dough almost cleans the sides of bowl. Gather dough into a ball and roll out 1/2" thick*. Cut into 2 1/2" circles. Cook on a lightly greased griddle or skillet about 3-5 minutes until golden brown. Turn and cook on the other side, then roll in sugar.

*You probably want them a tad thinner than that, or you might end up with slightly doughy centers. I was amazed that they cooked in so short a time as it is.
Also, the recipe says this makes 5 dozen. Following the instructions exactly, I got two. I don't know why the difference, but it's so.
These cakes are best fresh with strong unsweetened tea (imo), but left-overs are excellent when slightly toasted. They also freeze very well.

My Favorite Baked Potato Soup


Cold-weather comfort food.

The picture is not mine, but it's the same recipe with garnish. Mmm. Looks good.
Align Left

2/3 C butter
2/3 C flour
7 C milk
4 large potatoes, baked, cooled, peeled and diced. (about 4 cups)
4 green onions, chopped
12 strips bacon, cooked and crumbled
1 1/4 C shredded cheddar cheese
1 C sour cream
3/4 tsp salt
1/2 tsp pepper

In a large soup kettle, melt butter (I put the onions in here, I like them well cooked). Whisk in flour, heat and stir until smooth. Gradually add milk. Stir until thickened. Add potatoes, bring to a boil stirring constantly. Reduce heat and simmer for 10 minutes. Add remaining ingredients and stir until cheese is melted. Serve immediately.
Makes 2 1/2 quarts, 8-10 servings.

Maple Walnut Apple Cobbler


6 C sliced tart apples (4 large)
8 Tbs butter
1/2 C sugar
1/2 C buttermilk or plain yogurt (In a pinch, I've also used vanilla yogurt, and part sour cream.)
1 C flour
1 tsp baking soda
1 tsp baking powder
1/4 tsp salt
1 tsp vanilla extract
3/4 C maple syrup
1 C chopped walnuts

Lightly grease a deep 8 or 9 inch square pan (I double the batch in a 15x10) and place the apples in it. Set aside. Preheat the oven to 350*
Beat together butter and sugar until smooth. Add buttermilk, flour, baking soda, baking powder, salt and vanilla and beat again. Spoon the batter - it should be rather stiff- over the apples in the pan, using a spatula dipped in water to spread it.
Pour the maple syrup over the batter, then sprinkle with nuts.


Bake for 55-60 minutes, covering with aluminum foil, shiny side up, after the first 30 minutes. Let set at least 20 minutes before serving.

I am a person who would never in a million years buy imitation maple syrup for my pancakes. At the same time, the real stuff is insanely expensive (but I know it's actually a fair price, a LOT of work goes into a little syrup) and we haven't had any in the house for quite a while. (I miss making our own! :-( ) So for this recipe, I did the unthinkable. I made fake syrup. For this recipe, it works beautifully.

2 C sugar
1 C water
1 tsp maple flavoring

Heat water and sugar until sugar is dissolved. Remove from heat and add flavoring.


Maple Walnut Glazed Scones

I meant to take pictures earlier as I was making these, but I forgot to until they were mostly eaten! Oh well, they still look incredibly yummy.

Now, when it comes to pancakes, I'm a stickler for real maple syrup. I wouldn't be caught dead with Aunt Jemima in my house. However, I believe that using maple flavoring in baked goods is excusable, because you can't appreciate real syrup in baked goods, and maple extract is cheap in comparison.

This recipe was actually for pecan scones with molasses glaze. I changed the nut and the flavor, and I personally think they are wonderful.


Maple Walnut Scones

2 C flour
1/4 C packed brown sugar
1 tsp baking powder
1/2 tsp baking soda
1/2 tsp salt
6 tbs chilled butter, cut into cubes
3/4 C chopped walnuts
2/3 C buttermilk
2 egg yolks
1 tsp maple extract

Glaze:
2 tbs cream
4 tbs butter
1/2 C brown sugar
2/3 C confectioner's sugar
1/8-1/4 tsp maple extract

Preheat oven to 400*

For scones, mix dry ingredients and cut in butter until pea-sized. In a separate bowl, whisk milk, yolks and maple together. Make a well in the dry ingredients, and pour milk into well. Toss with a fork until it comes together in moist clumps. Gather into a ball and press into an 8" round. Cut into 6 (for large) or 8 (normal sized) wedges and place 1/2" to 3/4" apart on an ungreased pan. Bake about 16 minutes. Place on a rack.
While scones are slightly cooling, heat and whisk butter, brown sugar and cream together in a heavy sauce pan until sugar is dissolved. Remove from heat and whisk in powdered sugar and maple. Spread over warm scones and let set 30 minutes, or until glaze is set to the touch.

Enjoy!

Cranberry Coconut Scones with Orange Curd

Orange Curd

1 C sugar
1/4 C cornstarch
2 C orange juice
1/4 C lemon juice
3 eggs beaten until smooth
1/4 C butter
1 Tbs orange zest

Bend together sugar and cornstarch in a saucepan. Whisk in juice and beaten eggs. Bring to a boil and cook 1-2 minutes.


Remove from heat and whisk in butter and zest. Cover surface with plastic wrap and chill.

Coconut Cranberry Scones

2 C flour
1/4 C sugar
1 1/2 tsp baking powder
1/4 tsp salt
6 Tbs chilled butter, cubed
1/2 C coconut, shredded

1/2 C chopped fresh cranberries
1/2 C coconut milk, or milk

Preheat oven to 400* F

Mix dry ingredients, then cut in butter until mixture is a coarse crumb texture. Leave some pea-sized chunks of butter. Mix in coconut and cranberries.
Make a well in the dry mixture, and pour in the milk. Use a fork to pull the dry ingredients inward into the milk, just until combined. Do not over-mix.
Turn out onto lightly floured surface and form into a flat 8" round.
Cut into 8 wedges and place on a baking sheet 1/2" apart. Bake 18-20 minutes, until lightly browned.
Serve warm with orange curd and a sprinkle of coconut. Don't forget your cup of hot tea.

Bagels

I had fun taking pictures of the bagel making process today. Waaaaay too many pictures. I went through and weeded out several (it made me think of the word-cutting process in short story writing. It hurt a little. :P ), getting the number of step-by-step photos down to a reasonable 9. My apologies to dial-up users.

To make bagels, first get out The Best Cook-Book In The World.


Oh, and a bowl, measuring cups, mixing spoon, etc.
Mix 1 1/2 C hot water, 1 Tbs brown sugar, 2 tsp salt and 4 C flour together to form a stiff dough. Knead vigorously by hand for 10-15 minutes. (Ha ha. Like anyone actually kneads it that long. Just knead it for what feels like forever.)


Be sure to use your best vintage mixing spoon, the one passed down from generation to generation.
Place the dough in a clean bowl and cover with a damp cloth. Let rise one hour or until double. Punch down (make sure you punch out any large air pockets. These are baaaad for bagels.) and cut into 8 even pieces.


Form each piece into a ball. Don't roll it into a ball, pull the dough from top to bottom and pinch, forming a smooth top surface.


Place the balls on a well floured surface, cover and let rise another 30 minutes. Only 30 minutes. Don't let them over-rise. The big air-bubble thing. They should be poofy, but not double.
While the dough is rising, prepare the water bath by heating 2 quarts water, 2 Tbs brown sugar and 1 Tbs white sugar to a boil. Hint: the wider the pan, the better.


At this point it's also a good idea to spray your baking pans, turn your oven on to 425* and get things for variations out of the cupboard. My family loves them sprinkled with garlic salt, various seeds, onion flakes, pretty much anything you can think of. (For cinnamon & raisin bagels, sprinkle cinnamon, sugar and raisins on your counter when almost finished kneading the first time, and barely work in.)


When the bagels have finished rising, it's time to poke holes. I find the easiest way to get a decent looking bagel is to poke a hole in the center with my thumb, then pull dough from the top of the hole down with my index and middle fingers. It's not really complicated, I just make it sound like it is.


Your water should be boiling by the time you are done poking holes. Place as many as will fit in with room to enlarge in the water for two minutes on the first side, flip, and boil one minute on the other side. Don't over boil them. This creates soggy watery pockets that don't dry up no matter how long you bake them. Large air-holes from over-rising do the same thing.
Scoop them out, drain, and place on baking sheets. If you want different flavors, now is the time to do it. Sprinkling with powders or salts is easy enough, but if you want seeds and onion flakes, brush with egg white first.
Bake 20-25 minutes, until they are as brown as you like. Remove from pans and let cool on wire racks.


My personal favorite, the "Everything" bagel.


Bagels aren't just for breakfast, either. Lightly toasted, they are great for sandwiches and burgers. The best way to eat them, in my opinion, is hot from the oven with absolutely nothing added.

THE fried chicken


THE Fried Chicken (that's really its name)

1 chicken, cut into 8 pieces (all I used were thighs)
water
1 1/2 C flour
1/2-3/4 tsp salt
1/2 tsp black pepper
Cooking oil

(while your oil is heating...) Wash chicken thoroughly and remove excess fat. Place in a bowl and cover with water. Allow it to sit 3 or 4 minutes. Mix the dry ings. Remove the chicken from water, shaking off only part of the water; do not pat dry. Dredge pieces in the flour and place in hot oil deep enough to cover the pieces. Cook uncovered. Do not crowd the pieces in the oil. Turn once to cook and brown the other side. When deep golden brown, remove from oil and drain on paper towels. (it took about 20 min on each side for me)

I imagine that, to a southerner, my attempts at making southern fried chicken is like me watching with sympathy when our former pastor from Alabama decided to cook down maple syrup on his kitchen range... but hey, my chicken tastes pretty good! And he learned a lesson...

Chai!


Chai tea seems to be a big deal right now in the world of hot-beverages-on-the-go. To tell the truth, I've never had any other than what you see in the picture here. So, I couldn't tell you if this recipe makes the same thing you buy or not. All I know is that it tastes good on a chilly spring evening.


Chai Tea

1/2 C water


1 bag black tea, such as English breakfast, orange pekoe or Darjeeling. (I use Yorkshire)


1 3" piece cinnamon stick (I just use regular ground cinnamon... a couple of shakes.)


2 C milk


2 Tbs raw sugar or honey


1 tsp vanilla


1/8 tsp ground ginger


1/8 tsp cardamom


Combine water, tea bag and cinnamon in a small sauce pan and bring to a boil. Remove from heat, cover and let stand 5 minutes. Discard tea bag and cinnamon. Stir in remaining ings. Cook and stir over medium heat until heated, but do not boil. Serve in warm mugs.

This is also super easy to make in the microwave.


May I ask a favor? If any of you have had chai before, and want to try this recipe, let me know how it compares. I've asked a friend before *coughcoughyouknowwhoyouarecough* but she never got back to me. Humph.